2012 Trip 10: closing the cottage...sigh

Cedar Cove, White Lake - Oct 2012

Headed out on Saturday of the Thanksgiving weekend. Our last trip of the season, to a White Lake trailer resort where we winterize the Alto to put it away. Nice drive through beautiful countryside with full fall colours everywhere.

2012 Trip 9: it ain't no double bubble...

Bonnechere PP - Sept 2012

Certainly going to rain. Heading out a little early this afternoon, and the dark clouds are rolling in. The race to get hitched up before the rain will be a close one. Pretty much done and sure enough it started to pour. We waited a bit for it to subside, then headed out.

Let there be heat...anytime!

During our first season with the Alto, we soon realized the true value of an independent heat source, one that can function off the grid. During our options selection, we made the decision to opt for the heat pump instead of getting the heat pump as well as the furnace. As we place the external shower where the furnace would have gone, which in our opinion is the best location for it, we negated the possibility of added the factory installed furnace. Thus started he research for an alternative solution.

A search of the internet soon found Propex (http://www.propexheatsource.co.uk/), a furnace manufactured in England, for the RV/Marine market. Very small and much more efficient than American made models, we found a distributer just outside Ottawa. We decided that this would provide a good fallback option for those times where we are totally off grid. After much thought, it came time to start the install.

Using the supplied template, I determined where to drill the holes for the intake and exhaust tubes that exit through the floor. Needing to be on the outside of the aluminum frame members, there was only an 8 inch width to work within. This called for selecting the correct angle to install the unit inside, and after tons of repeated measurements, out came the drill. Prior to this, I removed a section of coroplast from where the tubes would exit, and replaced this with a sheet of aluminum. I did this to avoid the plastic coroplast would be affected by the heat of the exhaust.
A small cautionary pilot hole was drilled, which confirmed my measurements before drilling the pair of 2 inch holes required. Satisfied all was OK, out came the hole saw. Quick as a flash, the holes were done. I then lined the holes with aluminum tubing to protect the plastic core flooring from the exhaust heat. Overkill perhaps, but that's what I do.


Next was to position the furnace. After placing the tubes onto the furnace and test fitting, I discovered that it would be best to raise the furnace a bit to allow the tubes to bend towards the back of the Alto a little closer to the bottom of the trailer. I fabricated a couple of runners for the furnace to sit on, achieving the added height required.

Figuring out how to handle the tubes coming out below the Alto took a lot of thought. The tubes themselves had finished ends, and in most cases, they are just fastened beyond the edge of the vehicles. When we bought the furnace we also picked up the marine mount for through hull installations, figuring it might provide another option for these tubes. We mocked up both methods and decided we liked the look of the marine fitting. Using this required a mounting bracket, which I fabricated from sheet aluminum. It was then painted with black heat resistant BBQ paint, to match the lower moulding on the Alto. This was installed from underneath, and the intake and exhaust tubes were connected.


The hot air exhaust was routed to exit from the bench right by the washroom door, same as the factory furnace.

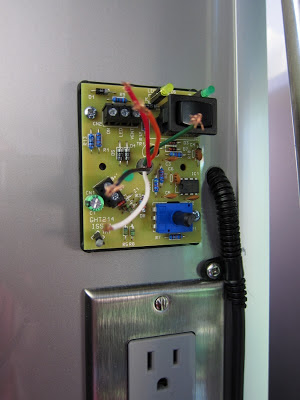
Once the furnace was installed and the tubes connected, I turned my attention to the wiring and gas. The thermostat was installed above the electrical outlet, which is a good spot as it is well away from the hot air outlet. I ran the wires along the existing ones and they blended in quite nicely. For power, I tapped into the existing furnace wiring harness. Even though we did not get the factory furnace, the wiring and gas connections are there, clearly part of the trailer assembly process, which no doubt facilitates post delivery sales of options, and allows guys like me to leverage them as well. Although I really doubt that crosses their minds. Having this already fused power saves a ton of wiring work. everything got wired up in no time, and a test of the fan proved at least part of the process worked.

A bigger challenge was the gas connection. Although already in place, because there was no furnace, the factory capped off that side of the pipe tee and the line. Reconnecting the line required working under the trailer in a pretty tight space. Before doing this, I installed a shutoff valve inside, to isolate the furnace from the gas source, a little added peace of mind. All of the gas lines were pre-flared, which was great. Once the valve was installed, I made the connections outside. Although a pain to work there, it went really smoothly. I then connected the furnace to the valve, turned on the gas at the bottle, and then tested the lines repeatedly with leak test fluid made for the job. No soap and water concoction here, I used the same stuff the pros use. No leaks at all, which did not surprise me given the extreme care I used during this phase.


Now the moment of truth...will all the effort pay off with a successful start up. I read the instructions to understand what the furnace would do, and turned on the thermostat. Sure enough, it worked exactly as stated. The fan runs to perform a pre-purge of the combustion chamber, the solenoid opens the gas valve, the electronic ignition sparks, and combustion fires. The fan then ramps up to full speed and out comes nice hot air. Given that I had probably spent a lot of time on this install, and countless trips back and forth to my basement workbench, the flawless operation of the furnace was very rewarding.

One addition I did need to make was realized the first time I washed the Alto. As I was rinsing off the side of the Alto, I noticed that the water seemed to drain right down the side and through the exhaust vent. During a rain storm, I figured there was a possibility that the water might make its way into the tubes, which would not be a good thing. I crafted a little roof for the vent, and also curved it downwards on the
forward side, to protect it when we were on the road as well.

I also added a spray shield to protect the tubes from anything tht the tires may kick up while we are cruising along.

To prevent anything from jostling into the furnace while driving, I added some aluminum L bracket to form a protective area, as well as a u-shaped bar the protect the gas valve.


So as an update, the furnace will be a good addition. On its own it can raise the temp in the Alto to make it quite comfortable. I would say the heat output is a little more than the electric oscillating heater. Not near the output of the heat pump, but certainly enough to take the chill off when we need it to.

2012 Trip 8: truly a classic park...

Bon Echo PP - Sept 2012

Surprisingly little traffic for a long weekend. Getting out of Ottawa was slow, but once on Hwy 7, it was smooth sailing the whole way to Bon Echo.

2012 Vacation Day 13 - Wednesday: homeward bound...

Heading home this morning. Went for a good walk around the site, then we took advantage of the morning sun and went for a quick swim. The water was certainly cooler than when we were at Rollins a couple of weeks back. Still nice to get in and float around a bit.

2012 Vacation Day 12 - Tuesday: winding down...

Off to Fish Creek Pond this morning, our last destination before home. We have planned to cut short our time away by a few nights, as the older of our two cats, Taffy, has been declining in the last few months and finds it harder when we are away so we don't want to be away too many nights in a row.

2012 Vacation Day 11 - Monday: a shortcut is not always a shortcut...

A little voice woke me early this morning with her classic line... "I was thinking". I reached for my watch in the dark and learned that it was 4:10 in the morning, nothing like starting your thinking for the day real early.

2012 Vacation Day 10 - Sunday: Range Rover... the new punch buggy.

Forecast predicts a nice day today, so we are heading to the Hamptons, more specifically, Montauk. This is as far east that you can go on Long Island. We want to check out the towns along the way and find a nice beach.

2012 Vacation Day 9 - Saturday: return of the pullcord shower...

Rained all night, and at times it was really hammering down. At least there was no wind, but there was an abundance of lightning and thunder. Boomer did not make an appearance until later in the morning, and his brother has been relatively quiet.

2012 Vacation Day 8 - Friday: the roar of the lawnchair...

Heading further west this morning on the island to Wildwood State Park. Slowly got packed away, took the opportunity of a quick wash of the Santa Fe and the Alto, as they were getting a little rod weary.

2012 Vacation Day 7 - love the MOMA...

Well, the walking has caught up to us. Not only are the feet sore, but the body is tired as well.

2012 Vacation Day 6 - Wednesday: forever walking...

Up early, as we have lots to see. This morning we caught the uptown loop, and we are lucky to get a great tour guide, which really makes a huge difference. He knew his history of the area and his delivery was excellent.

2012 Vacation Day 5 - Tuesday: the Big Apple...

Off to Manhattan this morning. Gus was up and waiting, so we went over around 7:30, in plenty of time to catch the 8:00 train to Penn Station.

2012 Vacation Day 4 - Monday: sand, breakers and sun...

Cooled off nicely last night, considering it was a pretty hot day. Decided to take a run over to Fire Island, a barrier island that consists of a massively long beach, dotted with numerous little towns. It is pretty much car free, so several ferries run to back and forth.

2012 Vacation Day 3 - Sunday: onto the Isle...

Up and out early. Our ferry reservation is for 1:30 out of Bridgeport Connecticut, but we are pretty close to Bridgeport so we want to see if we can catch an earlier one. Nice drive cross country, lots of estate type homes, long stretches of roads where the trees are totally covering the road, offering wonderful coolness to the drive.

2012 Vacation Day 2 - Saturday: and the skies opened...

No rush to pull out this morning as we only have about 4 hours driving ahead of us. Walked up and had a nice shower, in a well made, relatively new comfort station. Beautiful beam construction, with a vandal proof interior.

2012 Trip 7: Vacation - Long Island NY

Friday - Day 1: A Very Adirondack Day...

On the road around 9:30, we are heading for state park in New York called Moreau Lake. This will get us closer to the ferry point at Bridgeport CT. The route to Moreau takes us right through the Adirondacks, and it is a beautiful drive.

2012 Trip 6: Yuuuup...the're teardroppers

Rollins Pond SP - Aug 2012

Friday:
Headed out Friday morning, bit of an extra long weekend. Back to Rollins Pond, as the lure of a site directly on the water is truly most appealing. It is a nice drive to the Adirondacks, as it is mostly on secondary highways through quite scenic countryside.

Water System Accumulator Tank

Water systems in RV's are quite simple. There is a tank of water and a pump. Nothing else. This works quite well and is pretty reliable. However, water pumps make a fair amount of noise, not only the sound they make themselves, but also any vibration it transmits to anything it is connected too. Considering that the pump needs to run whenever a tap or toilet is used, the noise is always present whenever the need for water. Now don't get me wrong, it is not like a 747 landing, but it is enough to get minds like mine pondering a solution.

Pump manufacturers make these little devices called accumulator tanks, or pressure tanks. Anyone familiar with water systems tht run off a well or lake, know what I am referring to. The most common tanks are those blue ones made by Well-X-Trol. Basically they provide a pressurized source of water, so the pump does not have to run as often. On household system, these are generally in the 2-10 gallon range. The tank itself is split in two by a rubber membrane, one side is pressurized with air, the other is filled with water by the pump. The pressurzed air bladder applies pressure to the water in the other side, which in turn can then be fed out of a tap when needed. It fools the pressure switch on the pump itself, so that it does not come on until a low end threshold is reached. Works quite well, and the key to it all is the water capacity of the tank.

An RV water system works off the same principle, but without the tank, so the pump comes on every time water is needed. A little research revealed that there are small tanks available for RV's. I picked one up to install in the Alto. The tank I purchased is made by Shurflo, the brand of most RV pumps out there. The capacity of the tank is 24oz. Certainly not near the volume of household systems, but I figured it might be worth the effort. Found a good spot to mount it, got the correct PEX fittings, added a pressure gauge just for curiosity sake, and did the install in an afternoon.

Once I had everything sealed up again, I flipped on the pump. It immediately started to fill the tank, then stopped. Reading the pressure gauge, I fiddled with the upper pressure limit a bit to maximize the capacity of the little tank. No leaks, which is always a bonus.

Now for some testing. I was most curious just what was gained in terms of reducing the amount of time the pump ran and cycled during use. Running the kitchen tap at a reasonable rate of flow, the pump did not come on for at least 5 SECONDS! Then it ran for about 10 seconds to fill the little tank up again. Perhaps I overestimated the desired results, but I was hoping it would be of a little more value. I certainly overestimated the capacity of the tank. Although 24oz, in reality, it is probably only half that, considering the air membrane that sits in the middle. So 12oz really gets eaten up quickly. Factor in the amount of time the pump runs to refill the tank, compared to the delay in coming on, I suspect there is little or no benefit to be found in the installation of an accumulator tank of this size. It was an interesting mod though...

2012 Trip 5: Stellar Sandbanks...

Sandbanks PP - July 2012

Off to Sandbanks and Prince Edward County, or 'The County'as it is called by the locals, for an extended long weekend. Our yearly trip where we meet our Ottawa friends here, and touch base again with the friends that actually live in the County. Sandbanks is known for it's wide expanse of white sand beach and sand dunes and Prince Edward County is known for it's picturesque countryside, artisans and wineries.

2012 Trip 4: Simply Awesome...

Driftwood PP - June 2012

A new park this weekend, Driftwood PP, about 20 minutes west of Deep river on Hwy 17. On our way back from holidays last year, we camped here one night, did our usual tour of the sites, and discovered a whole section of sites that back right on to the beach. We decided right then to come back and we took down some site numbers.

That fan is really filthy

Just happened to notice just how filthy the fan blades were getting so it was time to get them cleaned up.
 
Looking at how to do this, I knew it would have to be from the inside, as getting on top of the curved Alto roof is probably not the best way to go about it. To get at the blades, you need to remove the screen, which at first attempt was quite resistant A little internet research showed me just where to pry to pop it off, and sure enough, no problem. To remove the blades, first remove the screw that holds on the knob to open the cover, then remove the 4 screws that attach the inner panel. Next, I used an allen key to loosen the spindle nut and allow the fan to slide off.

Being able to reach outside now, I cleaned the motor and mounts as well as the inside of the cover. Put it all back together and it was as good as new.

Wheel Bearing Repack

Last year when I cleaned the brakes, the bearing grease looked pretty good. It only had one season of miles on it at that point, and the grease was still bright blue. I figured they were still good for another season. I ordered some new bearing and seals from Dexter, not only in prep for the upcoming repack job, but also to keep on hand. From the research I have done, wheeel bearing and seals appear to be any trailer's Achilles heel. Not sure why, it just is. My first thought is this is due to lack of... you guessed it, maintenance.

I figured out the brand of grease used on the bearings, Kendall Super Blue, found a supplier in Ottawa, and got some for the repack job. I found a great number of vids available on You Tube that provided step by step instructions and lots of practicle tips on how to do the job. Watching the job being done is such a better
learning tool than reading about it in an article. This was a huge help.

Jacked up one side, with the jack stand well placed for safeties sake, and disassembled the hub and bearings. You have to pry out the inner bearing seal to remove that bearing, and in the process, it pretty much destroys the seal. The easiest method, of many suggested, seems to be using a claw hammer to work around the edge of the seal to pry it out. Once out, it is garbage. I then removed the inner seal, and cleaned it and the outer seal with brake cleaner.

I cleaned up all the grease on the spindle and inside the hub as well. Clean the hub brake surfaces also, using fresh rags of course.

Once the bearings were clean and dry, you want to examine them carefully for wear and heat burns. Install new bearing if you see any wear marks or excessive overheat burn marks. Mine were fine. Now the fun part, packing the bearings. It is not just a matter of smearing grease all over the outside of the bearing, you need to
"pack" it in between each roller and the race. A video best illustrates the action, but you are essentially forcing grease into the edge of the wide side of the bearing, using a press and scoop motion with a big blob of grease in the palm of your hand. If done correctly, you can see the grease emerging from the other side of the bearing. Keep going around the entire bearing a few times to ensure it is jammed with grease. If you do a poor job here, it will bite you hard at some point, most likely when you are in the middle of nowhere.


Place the inner bearing back into the hub, and gently tap the NEW inner seal in place. Apply a liberal amount of grease to the inside surfaces of the hub where the bearings sit, as well as the spindle itself. While all this is apart, it is also a good idea to clean the brake linings and grease the contact points of the brake
linings and the spindle backing plate. This is a different grease from that used on the bearings. Slide the hub back on the spindle, insert the outer bearing, then install the pressure washer and spindle nut.
the silver grease is for the brake/hub contact points
Tighten the spindle nut while rotating the hub to seat the bearings, then back off the nut just slightly. Install the spindle nut lock or cotter pin, and you are done. This pretty much covers it, but I want to say again, these are not explicit instructions, and the vast majority of people out there should just be reading
about the job, not doing it.

2012 Trip 3: Rain, rain, rain...

Murphy's Point PP - June 2012

Rainy and overcast, and the forecast is for more of the same all weekend. Still headed out though, as it is nice to get out of the city and we are very comfortable in the Alto regardless of the weather. Hitched up last night, and it was only a drizzle when we pulled out.

2012 Trip 2 - Amazing May Weather...

Silver Lake PP - May 2012

Silver Lake is becoming our Victoria Day Weekend destination.  We are booked into the same site as last year, one that offers nice privacy on 3 sides, and is set in from the road a bit. Traffic was not too bad at all.  Did not notice too many other trailers on the road, which given that we are pulling our own, it is something we seems to keep an eye out for. Even getting out of the city was smooth.

2012 Trip 1 - Another Season Starts...

Bayview Lodge, White Lake - May 2012

So once again we start another season, anxious to get out again in what is now our "almost new again" trailer. Heading to Bayview Lodge on White Lake. Thought we would try going here this year as a change. We like opening at White Lake, as it is only an hour away, and being a private campsite, it has the 3 hookups we are looking for.