Another Bearing Repack

Once again it is time to pull apart the hubs and clean and repack the bearings. At the same time, I give the brakes a good cleaning. It's a pretty straight forward job, but it does take a bit of time, as you have to jack up the Alto, pull everything apart, clean and repack, then put it all together again. I imagine at some point I will just have it done somewhere, but until that time comes, it will be one of those spring jobs I do.

I noticed there was a fair amoint of brake dust on the inside of the rims, so I suspect I have been re-adjusting the shoes perhaps a tad to close. This time I will make a point of leaving them backed off just a little bit more. I can always give them a fine tune if I find the electric brakes are not grabbing enough. Once I got the hubs off, everything looked pretty good. The grease is still bright blue, with no sign of discolouring of that icky milky consistancy when water has started to get mixed in.

Gave the drums and the shoes a good cleaning, then pulled the back seal, cleaned both the bearings, had a real close look for any pitting or excessive heat scorching, but all looked good. Repacked the bearings, greased up the races, then put the hubs back on. Tightened up as per the Dexter Service Manual, and we were done. Checked the brake adjustment, then headed over and did the other side.


front bearing ready to go...

a lot cleaner now...and still in real good shape

I'm rotating the tires, so the service side tire now becomes the spare. The inside of the rims were in bad need of cleaning to get rid of the brake dust, but afterwards, they looked great. Getting the spare tire back in place was probably the part of the process thst I was least looking forward to. The way it hangs under the tongue is a very nifty setup, but a serious pain in the ass to re-install. There had to be a simpler way to do this other than brute effort. After staring at it a bit, which is an activity that has always served me well in the past, I figured that whatever method used to help the process had to utilize gear that would be with us at all times.

Looking in the trunk, I spied the Anderson Levellor, and the wheel chocks. I figured if I could get one side propped up high enough, it would be easy to just raise the other side and start threading on the support bar. Sure enough, I was able to use the levellor and chock to get the one side almost totally in place, then I easily lifted the other side up, held it in place with my knee, then secured the whole thing. Easy peasy.
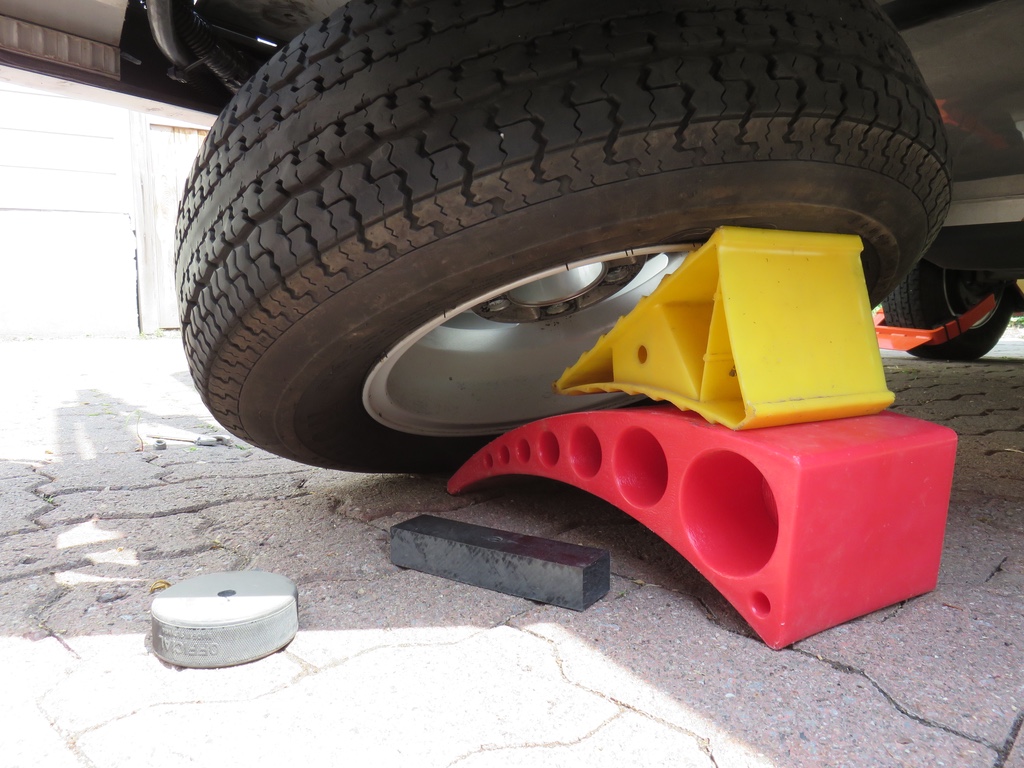
works like a charm

I think we could probably go three years between repacks, based a lot on the current yearly milage we do. Will we go the three years, hard to say. It is nice to know that the bearings are in good shape.

A few winter Alto projects

While I was under the Alto last spring trying to figure out how to lower the spare tire to check its pressure, I could not help but to look at the underside of the Alto from this new perspective. I mean, just how often are you really down there crawling around? My gaze soon fell upon the connections for the propane piping. In this small area, the connections branch off to the cooktop and fridge, then travel on to the water heater and furnace branches. Jutting out from the smooth underbelly of the Alto, they seemed a little exposed to the road elements. Naturally, my mind wondered if there was a little project to be found here...and there was.

Generally during our closing up weekend, I put together a little list of potential Alto projects to work on over the winter. Most never make it off the list, but some definitely do. I remembered the propane connections, and thought that a stone shield, made from thin aluminum, might offer a little protection from road dirt and grime. As well there is the unmeasurably small chance that a stray rock would find its way towards these connections. Of course, how to bend such a piece of aluminum stock became yet another little project.

I have no problem sourcing sheet stock aluminum, as long ago I found a great place for this. I did though, have no way to bend it nicely. The place I source from can only cut, as they have no bending brake. Several attempts to experiment with bending stock resulted in some rather crude distorted pieces. A little You tube research revealed that I was far from alone with this dilemma, and a number of homemade bending brake solutions were soon being viewed. From a collection of videos, I formed my own plan to build myself a little bending brake. At this point I imagine that some of you right now are saying to themselves..."Really???"

multiple holes for the clamp bolts allows the clamp pressure to be close to the stock. Brake bolts to the Workmate
angle piece clamps the stock, pulling up in the two handles bends the stock.

The pictures show you how I solved the bending issue, and I will say that it works beyond all expectations!

In no time I was able to bend and create a little stone shield. It was painted the Alto silver, and then installed. It hangs there unbeknownst to all, except perhaps the occasional chipmunk or squirrel.


exposed pipe and fittings

nicely protected


I also took the opportunity to fashion a little bracket for the new Trimetric monitor. It would have mounted easily flat to the bulkhead under the front table, but I had the sense that it would be easier to use and view if it was slightly tilted up from the bottom. A little measuring and bending…voila!


Last fall while pulling out the door step I heard that distinctive sound of something just not right. Peering under the step revealed that one of the plastic stops had cracked apart. On our production version, there are 3 plastic stops, when working with a band of flexible plastic(?), holds the door step in either an open or closed position. The stops that prevent the door from being pulled completely out had deteriorated to the point of cracking when impacted by the step.

Closer examination revealed that an unusually cheap hollow square plastic tube had been used to create these stops. I was a little surprised at this, given that SC makes prolific use of UHMW for a variety Alto fabrications, and scraps from this other work would be perfect. So I found a scrap piece at my favourite plastic supplier, cut a couple of new stops and installed them. Good as new...well actually, better than new.


2016 Trip 2: it finally feels like summer...

Sharbot Lake PP - May 2016

Friday:
Long weekend...always good and more so with a great forecast of good weather with no rain.  We have a nice site on the water at Sharbot Lake, one of our new favourite destinations. As usual, slowly got the Alto loaded up during the week, hitched up Thursday night, then headed out after work on Friday. Traffic was light, even though it is a long weekend.

leaves not fully out yet...so the height of the trees is very noticeable

2016 Trip 1: imagine our nice surprise!

Cedar Cove Resort, White Lake - May 2016

Friday:
First time out this year...and quite frankly, it never gets olds. We brought the Alto home out of storage a couple of weekends ago, and we then worked on putting our gear back into it. We don't totally empty it, but we do take out what seems to be a lot of stuff.

As Dale works in the west end of the city, we again started our routine of me driving her to work in the morning, then picking her up after work, with the Alto in tow. Definitely saves us a bit of time. With the Alto following along behind us again, we have resumed our relaxed easy driving pace once again. Not that we don't move at the speed of the traffic, it's more of an overall attitude, a weekend attitude. The fast pace of the week justs starts to melt away, and the drive to the campsite is the first step. You notice more around you when you are just rolling along, and it is certainly more relaxing. Part of this is also planning to travel as much as possible on secondary roads, and avoid the big 4-laners. I've heard this called "shunpiking". Shunning the turnpike. Good term.

Arrived at the campsite and when we glanced towards the lake, just guess what we saw...another Alto! A blue 1743. Our site would be right beside them.


2015 Trip 12: a bittersweet weekend

Cedar Cove Resort on White Lake - Oct 2015

Friday
The excitement of getting out again in the Alto is soon tempered with the realization that this is the last weekend of the season. The reality of it in our neck of the woods, it gets colder, the campgrounds close up on Thanksgiving weekend and the season ends. Simple as that. We say we would camp longer if we could, but now we only get the camper nice and warm, then mostly hibernate inside.


Opening and Closing Process

Thought it was about time to post the steps that we do to open and close our Alto. It's not really that big a job, and I probably have a few steps in here that are perhaps extra, but I figure while I am at it, why not. So here goes. I've recently updated a few things here.

Opening

1. Drain all the tanks. Again, being at a full service campsite makes the routine a lot easier.

2. Fill the fresh water tank, about 1/2 full, to give it a bit of a rinse.

3. Turn on the pump and run water through all the taps, until the water runs clear, including the toilet.

4. Drain all the tanks again.

5. For a few years I was using bleach to sanitize the fresh water tank and lines, but being tired of the lingering smell, I investigated other options. I found a number of write ups about using citric acid to sanitize. Food safe citric acid is quite popular with the craft beer / wine making crowd. Tanks and carboys are disinfected with a mixture of citric acid and water. I decided to give it a try, and it has now become my new routine. It rinses out well, and has minimal after smell. We do not use the tank for our fresh water drinking supply, but those that do may want to continue using bleach, for a rigorous disinfection.

For those with a Truma system, there is no need to bypass the Truma, as citric acid is what Truma sells as a descaling product for their internal hot water tank.

Citric acid comes as a powder. Be sure to purchase a high quality food grade product.  The working mixture I use is 500g (almost 2 cups), dissolved in a bucket of water. Pour this into the fresh water tank, then fill the rest of the tank with fresh water. Now pump this mixture through all the pipes, and let the water system sit untouched for most of the day.

6. Drain the fresh water tank, then fill it again. Now pump this clear water through all the pipes to give them a good flush. If desired, you can certainly repeat this process.

7. I now switch back the hot water heater bypass valves to their normal operating position, which is inline with the supply lines, and fill and flow some water through the hot water tank.

8. I once again do the rubber seal conditioner treatment, just to start the season. I will treat the seals a couple of times over the course of the season, it is easy and fast to do, and pays off in the long run.

9. Generally at this point, I crack a beer and then clean the windows. We clean our windows a lot, given that they are the focal point of the Alto, and provide such a positive vibe to the whole Alto. Why not keep them at their best!

Closing

We always try to go to a campsite that has full hookups to do both our opening and closing. It is real handy to have the water and sewer, this allows you to do a real good flush of the tanks without having to haul the trailer to a dump station.

1. Before heading out to the campground, I put a bucket of a cleaning mix into the grey tank and the black tank. The mixture is a combination of Dawn dish detergent and Calgon water softener. The theory being that the Dawn is an excellent grease cutter, and the Calgon is an excellent surfactant, helping get rid of the work done by the detergent. I used this method first in 2015 and it seemed OK, so I continue to  do the same at the end of every season. I mix up 1/2 cup of each in a bucket of hot water, and then pour one bucket into both the black and grey tanks, before we drive out to the campsite. It sloshes around in the tanks on the drive, then just sits there working while you camp. It then gets drained when we start the tank cleaning on the final morning we are there.

2. Drain the hot water tank (Truma or otherwise). For the Truma, there is a small chrome valve on a tube going through the floor. To drain, move the lever in line with the tube. As well, move the yellow lever in line with the body of the pressure relief valve. Open a hot water tap to allow air into the system, which helps it drain faster. Once it is empty, close the valves.

3. Rinse the black tank. We have one of those tank wands which connects to a hose, and is then pushed into the tank through the toilet, and the water jets spray down the tank. We always do our winterizing at a campground that offers all three services. Having the tanks connected to a sewer system helps the whole process, as the rinsing then just flows through the sewer hose.

4. Fill some water into the grey tank to help flush out any remaining gunk in the tank. If you have the water and sewer, always a good idea to give the tanks a good cleaning.

5. In preparation for the RV antifreeze, the very first step is to bypass the Truma. This is done using the white plastic valves that are on the red and blue water lines, right near the Truma. There is a vertical pipe that also connects one side of each valve. The role of these valves are no prevent any of the antifreeze fluid from entering the Truma. This fluid may cause issues with the hot water tank in the Truma, so it must be bypassed. Move each plastic valve lever so that they point to each other, vertical in orientation with the bypass pipe that connects the two valves.

6. With the Truma bypassed and all the tanks empty, it is now time for the RV antifreeze to be pumped through the lines. I have been using the propylene glycol based stuff, rather than the ethanol based, as it seems to leave less of an after smell in the tank and lines, and it is apparently easier on any rubber seals or gaskets that may be in the system. It is also non-flammable. It is however, definitely more expensive, but the general consensus is that it is a better product. Be sure to read the label closely though, as there are versions out there with called ethanol/glycol blends. Not the same thing at all.  Pour at least one jug, perhaps even a bit more, into the fresh water tank. Remember to check that you have closed the fresh water drain valve, located under the Alto, on the service side of the Alto. Turn on the pump, and open each of the hot and cold taps, one at a time. As the pump picks up the RV antifreeze, the water in the lines will be replaced by the anti-freeze. You will see it come out the taps, as it is generally coloured fluid. It is important to do this for both the hot and cold lines. Do the same for the shower taps, the outdoor shower and the toilet. Don't forget the toilet sprayer. Add more anti-freeze to the fresh water tank if needed.

7. Now pour some anti-freeze down the kitchen sink, and the shower drain.

8. I now empty the black and grey tanks again, to get rid of the water that came out of the lines.

9. I then add more anti-freeze to the sink, shower and the toilet. I want all the tanks to have a little anti-freeze in them over the winter. That pretty much completes the job.

10. I also treat all the rubber seals before putting the Alto away. Actually, I do this a few times a season. The rubber seals are a big part of the Alto, so why not keep them in good shape. I contacted Frederic at Safari Condo, and they use a product made by Thetford, called Slide Out Rubber Seal Conditioner. I wipe it on all the seals with a small rag. It works great, as after 5 years, the seals on our Alto look brand new…soft and pliable.


2015 Trip 11: raining acorns...

Sharbot Lake PP - Sept 2015

Friday
Back to Sharbot Lake this weekend, as we have snagged another site on the water. It would seem that the quest for water sites is now our number 1 priority. We are hooked on them, as they change the whole dynamic of a weekend away.

2015 Trip 10...toasty swimmin'

Rollins Pond S.P. - Sept 2015

Friday
Heading to Rollins, one of our favourite parks, mostly because almost all of the sites are on the water. If you are lucky enough to snag one in what we call the beach bay, then you will have a site as good as it gets.


2015 Trip 9: I really like this site...

Bonnechere PP - Aug 2015

Friday...

From the amount of traffic, it feels like a long weekend, the roads are jammed up. Took us forever just to get a little outside the city. Oh well, at least the weather is good, and the weekend looks good. We may drive through a few isolated showers, but the forecast is lookin' fine.


2015 Trip 8: a spectacular weekend

Sharbot Lake PP - Aug 2015

Friday
Off to Sharbot Lake this weekend, where we have not been to since our tenting days, what feels like and is actually, many decades ago. Scooted home after work, grabbed the Alto, and picked Dale up at work, a little routine that easily saves us a half hour or so. Little traffic on Hwy 7 this evening, so we made great time to the park.