During our first season with the Alto, we soon realized the true value of an independent heat source, one that can function off the grid. During our options selection, we made the decision to opt for the heat pump instead of getting the heat pump as well as the furnace. As we place the external shower where the furnace would have gone, which in our opinion is the best location for it, we negated the possibility of added the factory installed furnace. Thus started he research for an alternative solution.
A search of the internet soon found Propex (
http://www.propexheatsource.co.uk/), a furnace manufactured in England, for the RV/Marine market. Very small and much more efficient than American made models, we found a distributer just outside Ottawa. We decided that this would provide a good fallback option for those times where we are totally off grid. After much thought, it came time to start the install.
Using the supplied template, I determined where to drill the holes for the intake and exhaust tubes that exit through the floor. Needing to be on the outside of the aluminum frame members, there was only an 8 inch width to work within. This called for selecting the correct angle to install the unit inside, and after tons of repeated measurements, out came the drill. Prior to this, I removed a section of coroplast from where the tubes would exit, and replaced this with a sheet of aluminum. I did this to avoid the plastic coroplast would be affected by the heat of the exhaust.
A small cautionary pilot hole was drilled, which confirmed my measurements before drilling the pair of 2 inch holes required. Satisfied all was OK, out came the hole saw. Quick as a flash, the holes were done. I then lined the holes with aluminum tubing to protect the plastic core flooring from the exhaust heat. Overkill perhaps, but that's what I do.
Next was to position the furnace. After placing the tubes onto the furnace and test fitting, I discovered that it would be best to raise the furnace a bit to allow the tubes to bend towards the back of the Alto a little closer to the bottom of the trailer. I fabricated a couple of runners for the furnace to sit on, achieving the added height required.
.jpg)
Figuring out how to handle the tubes coming out below the Alto took a lot of thought. The tubes themselves had finished ends, and in most cases, they are just fastened beyond the edge of the vehicles. When we bought the furnace we also picked up the marine mount for through hull installations, figuring it might provide another option for these tubes. We mocked up both methods and decided we liked the look of the marine fitting. Using this required a mounting bracket, which I fabricated from sheet aluminum. It was then painted with black heat resistant BBQ paint, to match the lower moulding on the Alto. This was installed from underneath, and the intake and exhaust tubes were connected.
The hot air exhaust was routed to exit from the bench right by the washroom door, same as the factory furnace.
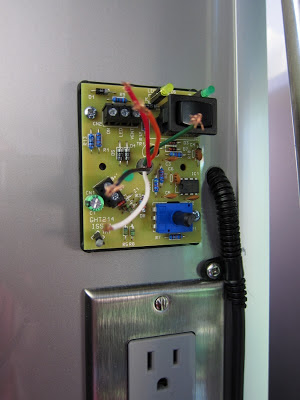
Once the furnace was installed and the tubes connected, I turned my attention to the wiring and gas. The thermostat was installed above the electrical outlet, which is a good spot as it is well away from the hot air outlet. I ran the wires along the existing ones and they blended in quite nicely. For power, I tapped into the existing furnace wiring harness. Even though we did not get the factory furnace, the wiring and gas connections are there, clearly part of the trailer assembly process, which no doubt facilitates post delivery sales of options, and allows guys like me to leverage them as well. Although I really doubt that crosses their minds. Having this already fused power saves a ton of wiring work. everything got wired up in no time, and a test of the fan proved at least part of the process worked.
.jpg)
A bigger challenge was the gas connection. Although already in place, because there was no furnace, the factory capped off that side of the pipe tee and the line. Reconnecting the line required working under the trailer in a pretty tight space. Before doing this, I installed a shutoff valve inside, to isolate the furnace from the gas source, a little added peace of mind. All of the gas lines were pre-flared, which was great. Once the valve was installed, I made the connections outside. Although a pain to work there, it went really smoothly. I then connected the furnace to the valve, turned on the gas at the bottle, and then tested the lines repeatedly with leak test fluid made for the job. No soap and water concoction here, I used the same stuff the pros use. No leaks at all, which did not surprise me given the extreme care I used during this phase.
.jpg)
.jpg)
Now the moment of truth...will all the effort pay off with a successful start up. I read the instructions to understand what the furnace would do, and turned on the thermostat. Sure enough, it worked exactly as stated. The fan runs to perform a pre-purge of the combustion chamber, the solenoid opens the gas valve, the electronic ignition sparks, and combustion fires. The fan then ramps up to full speed and out comes nice hot air. Given that I had probably spent a lot of time on this install, and countless trips back and forth to my basement workbench, the flawless operation of the furnace was very rewarding.
One addition I did need to make was realized the first time I washed the Alto. As I was rinsing off the side of the Alto, I noticed that the water seemed to drain right down the side and through the exhaust vent. During a rain storm, I figured there was a possibility that the water might make its way into the tubes, which would not be a good thing. I crafted a little roof for the vent, and also curved it downwards on the
forward side, to protect it when we were on the road as well.
I also added a spray shield to protect the tubes from anything tht the tires may kick up while we are cruising along.
To prevent anything from jostling into the furnace while driving, I added some aluminum L bracket to form a protective area, as well as a u-shaped bar the protect the gas valve.
So as an update, the furnace will be a good addition. On its own it can raise the temp in the Alto to make it quite comfortable. I would say the heat output is a little more than the electric oscillating heater. Not near the output of the heat pump, but certainly enough to take the chill off when we need it to.


.jpg)
.jpg)
.jpg)
.jpg)


.jpg)
.jpg)
.jpg)
.jpg)
.jpg)
.jpg)
.jpg)
.jpg)
.jpg)
.jpg)
.jpg)
.jpg)
.jpg)
